CML
This section describes installation of the Ostinato for CML labbing appliance.
If you are installing Ostinato on a native system (Windows, macOS, or Linux), see the corresponding platform sections instead.
Installation
- Untar
ostinato-lab-cml-<VERSION>.tgz- the package contains the node definition file (.yaml) and the Ostinato image (.qcow2) - Import the Ostinato node definition
- From the CML UI Dashboard select Tools > Node and Image Definitions
- Select Node Definitions
- Click Import and choose the
ostinato.yamlfile - Click Back
- Upload the image
- Select Image Definitions
- Click Manage
- Choose the Ostinato VM image file (
.qcow2)to upload - Click the Upload Image button
- New images are displayed under the Uploaded Images section - click Refresh to update the list
- Click Create New Image Definition
- Create Image definition with following values, replacing
<VERSION>with the actual version- Set ID as
ostinato-<VERSION> - Set Label as
Ostinato <VERSION> - Set Description as
Ostinato Traffic Generator <VERSION> - Set Disk Image to the just uploaded Ostinato
.qcow2image - Set Node Definition to Ostinato
- Leave other fields to their defaults
- Click Create New Image Definition
- Set ID as
Usage
- Add a Ostinato (Lab) node to the lab
- Connect links from Ostinato to other nodes
- Start the Ostinato node (or the lab)
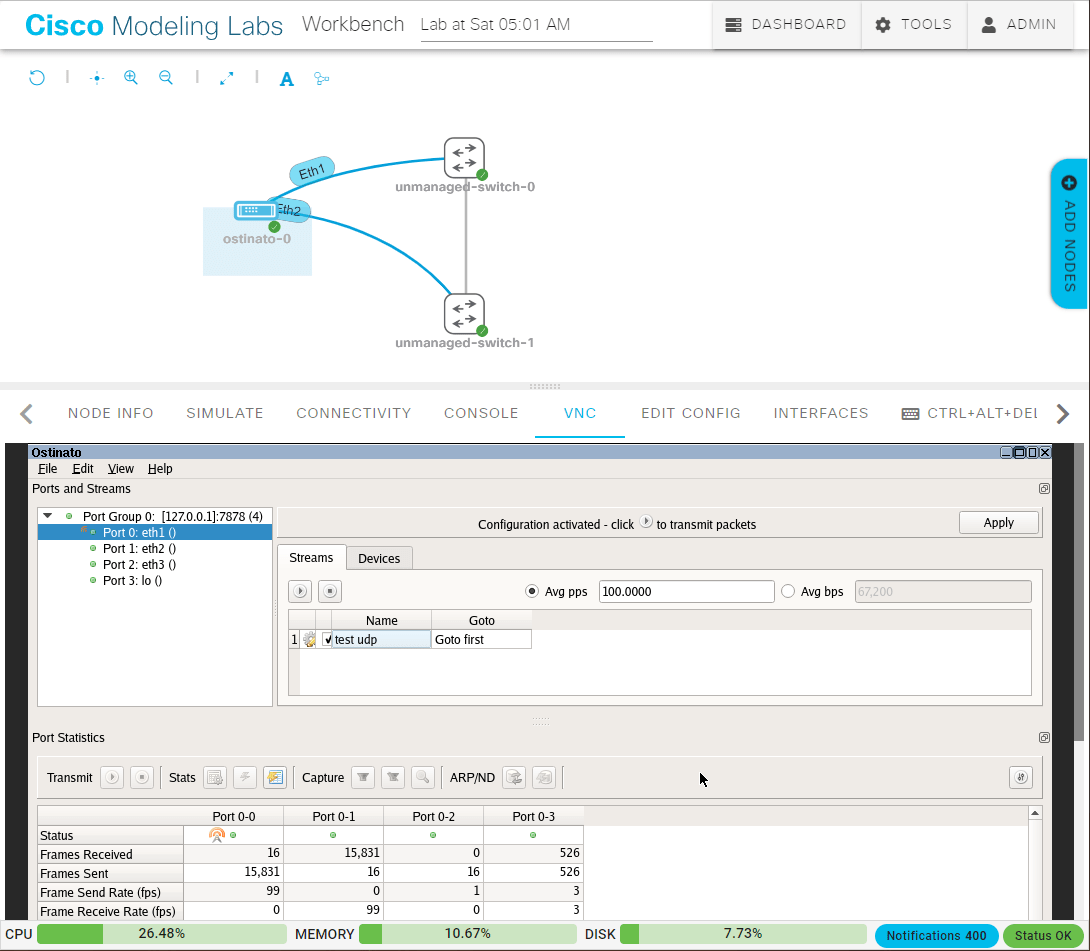
- Select the Ostinato node and use the VNC tab to access the Ostinato GUI (no output is expected on the Console tab)
Multiple Ostinato nodes
You don't need multiple Ostinato nodes in a lab. You can connect links from a single Ostinato node to all the other nodes in a lab.
External VNC client
If you find VNC within the browser difficult to use for any reason, you can use the CML breakout tool to launch a local native VNC client to access the Ostinato GUI.
Native Ostinato GUI
If you have a Solo or Pro or Business license, you can run the Ostinato GUI natively and connect to the Ostinato node within the lab using the mgmt port -
- Add an External connector node to your lab
- Configure the External connector node to use bridge mode (instead of NAT)
- Create a link to connect Ostinato node's
eth0/mgmtport to the External connector node - Start the External connector node
- (Re)start the Ostinato node so that the mgmt port can get an IP address via DHCP