Turbo
Turbo Drone is a high-speed Ostinato add-on that provides 10Gbps, 25Gbps, 40Gbps and 100Gbps line rate traffic generation capability. It is a drop-in replacement for the Drone agent shipped along with the standard Ostinato package.

System requirements
- Linux for the Turbo agent; the GUI controller can run on any OS
- One of the following Linux distros -
- CentOS 8
- Rocky 9
- Ubuntu 20.04 LTS
- Ubuntu 22.04 LTS
- Ubuntu 24.04 LTS
- Linux Kernel 5.4.0 or higher (check using
uname -a). Some NICs may require a higher kernel version - Intel/AMD (x86) multi-core CPU
- Memory - 2GB or more
- A multi-queue NIC (check using
ethtool -l <port-name>) - all 10Gbps or higher NICs support multiple queues. So do vNICs such as AWSena, Azurehv_netvsc, VMWarevmxnet3etc. - For best performance, Intel NICs are highly recommended
Limitations
- Rates can be guaranteed only on bare-metal. VMs will also likely get full line rate, but be mindful that the hyper-visor, due to resource-sharing, may introduce performance restrictions
- The max packet size that can be generated is between 3000 to 3500 bytes, depending on the NIC and driver (this is a limitation of the AF_XDP technology)
- Ostinato/Wireshark cannot capture Turbo Drone generated packets (this is a limitation of the AF_XDP technology)
How to Install
-
Install the deb or rpm package as applicable to your system
orsudo apt install ./ostinato-turbo-agent-<VERSION>.debsudo yum --nogpgcheck install ./ostinato-turbo-agent-<VERSION>.rpm -
Assign required privileges to turbo-drone
sudo setcap cap_bpf,cap_sys_resource,cap_net_raw,cap_net_admin=eip `which turbo-drone` -
Edit
/etc/xdg/Ostinato/drone.inito specify the 10/25/40/100G ports on your system and your license keys (each port needs a unique license key)
[Turbo]
Ports/size=2
Ports/1/name=eth1
Ports/1/speed=10G
Ports/1/key=<license-key1>
Ports/2/name=eth2
Ports/2/speed=25G
Ports/2/key=<license-key2>
[Turbo]
License/size=2
License/1/port=eth1
License/1/speed=10G
License/1/key=<license-key1>
License/2/port=eth2
License/2/speed=25G
License/2/key=<license-key2>
If a port is not explicitly specified in the Turbo section alongwith it's speed and license key, it will fall back to work as a normal Drone port (without the full line rate support).
Activate your license
To activate your license(s), make sure you fill in the port name, speed and license key details in drone.ini as specified above and then run -
turbo-drone -a
Follow the instructions given by the above command.
How to Run
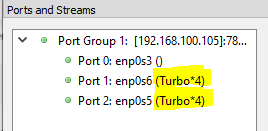
From the Ostinato GUI, goto File|Add New PortGroup and enter the hostname (or IP address) of the host running turbo-drone. Turbo ports will show up in the GUI annotated with (Turbo*n) where n is the number of CPU cores used for high-speed traffic generation -

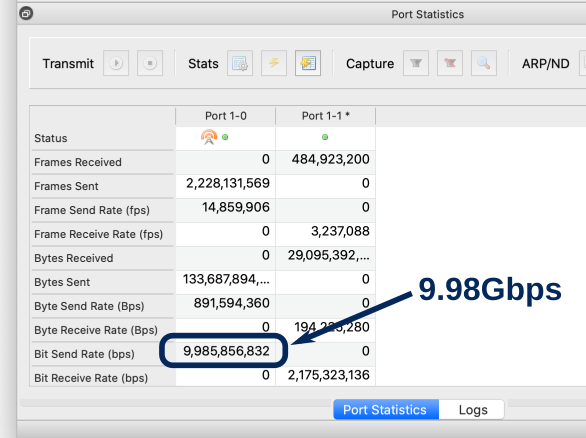
Open this speed-test stream in Ostinato and check what is the max rate that turbo drone can achieve on your system.
If you don't get the full line rate of the port (capped by your Turbo license speed), find the number of CPU cores required for your system as shown below.
Adjust number of CPU cores
The maximum TX rate achieved on a system depends primarily on the NIC hardware and NIC driver. Depending on what is the max performance of a single CPU core with the given NIC HW and driver, we can use multiple CPU cores.
But first we need to find out the single CPU core performance for your system. This needs to be done only once - unless you upgrade hardware or your Linux Kernel, in which case you might want to repeat it.
Add MaxTxPpsPerCore under the Turbo section in /etc/xdg/Ostinato/drone.ini and set it to a very large value e.g. 150 Mpps as shown below (do not use "," or any other thousands' separator character) -
[Turbo]
...
MaxTxPpsPerCore=150000000
Restart turbo-drone so that it re-reads the .ini file -
turbo-drone
Make sure the Ostinato GUI shows only one CPU core is used i.e. you see (Turbo*1) against the port name.

Settings in drone.ini
You MUST restart turbo-drone after changing any setting in drone.ini file for it to take effect
Open the speed-test stream again in Ostinato and note the max rate you achieve with 1 CPU core. Now change the MaxTxPpsPerCore to this value (or a slighly lower value) and restart turbo-drone for it to take effect.
You should now see more than one CPU core being used (Turbo*n). Retry the speed-test stream.
If you still don't get the full line rate, follow the below performance tips and if that doesn't help, reach out to support with the info listed in debug tips
Performance tips
- Disable hyper-threading in the BIOS
- Change system profile for performance (requires
tuned)sudo tuned-adm profile throughput-performance - Tune the system for peak Ostinato performance
NOTE: It's highly reccomended to run
sudo turbo-tune config <list-of-space-separated-eth-ports>turbo-tuneevery time before runingturbo-droneto ensure the system is setup and configured/tuned correctly forturbo-drone.
Debug tips
- Run
turbo-drone -dto enable debug logs; save them in a file and provide for analysis - Also provide output of
sudo turbo-tune info <list-of-space-separated-eth-ports>alongwith drone logs
If you are not getting the expected performance, in addition to the above, do the following and provide the logs -
-
Make sure you have the following utilities (if not, install them) -
timeout mpstat turbostat perfstat perf -
Download and load this standard test stream in Ostinato and start traffic before running the below commands -
-
Find CPU utilization -
From the above output, note down the CPUs with %idle < 90% (i.e. non-idle CPUs)$ mpstat -P ALL 5 3 Linux 5.3.0-62-generic (sirius) Wednesday 05 May 2021 _x86_64_ (3 CPU) . . . Average: CPU %usr %nice %sys %iowait %irq %soft %steal %guest %gnice %idle Average: all 0.33 0.00 26.27 0.02 0.00 7.13 0.00 0.00 0.00 66.24 Average: 0 0.00 0.00 78.75 0.00 0.00 21.25 0.00 0.00 0.00 0.00 <<<<<< Average: 1 0.73 0.00 0.07 0.00 0.00 0.13 0.00 0.00 0.00 99.07 Average: 2 0.27 0.00 0.13 0.00 0.00 0.00 0.00 0.00 0.00 99.60 -
For each of those CPUs, run the following commands replacing
with the actual CPU number (Each command takes about 20-30 seconds each) - Make sure you run the above commands for each non-idle CPU.sudo turbostat -c <cpu> --quiet -n 3 | grep -v "-" sudo timeout 20 perf stat -C <cpu> -I 5000 sudo perf top -C <cpu> -E 10 --stdio # press 'q' after 10 seconds
Provide all the logs for analysis